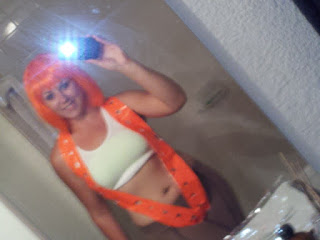
Don't Forget Your Multipass!!
And don't forget, you get more Candy with a Gun...
It's that special time of year again, HALLOWEEN!! Where you can enjoy smashing pumpkins, accidentally kiss your masked cousin, and steal from your kid's candy basket! Meanwhile, Grandpa John's yelling at the innocent 2 year old, Dora, steppin' on his lawn...?!!?! YOU KIDS GET OFF MY LAWWWWWN!!!!
Well, it's time to get ready for Halloween's shenanigans in a DIY Get-up that'll have you lookin' ever-so-stylish..this costume is for boys and girls. I suggest just girls...unless, you're super BA!
 |
| DIY Leeloo Costume |
- One Roll of Orange Duct Tape: For the Suspenders. Keep in mind, I am 5'3; so, you need to purchase accordingly. Orange Duct Tape is available at Staples.
- Gold or Tan Spandex Leggings: I purchased mine for $5 at Rugged Wearhouse
- A Sharpie Marker: For drawing the lines on your leggings
- Boots: To wear on your feet...haha
- Orange Bob Wig: I purchased mine at Morris Costumes for $25 bucks, and it's GREAT quality and looks amazing.
- 2 Small Mens Ribbed White Tanks pre-shrunk (get appropriate size, duh)
- 6 Snaps and a Needle/Thread/Scissors
- Tape Measure
Time: One full night after work and a Bottle O' Wine
Pattern: You are going to make your own and wing it...
Shirt:
This is super easy. Grab a pre-shrunk tank, roll it up...done-ski!
Orange Suspenders:
 |
| LeeLoo DIY Costume |
- Make the Pattern:
- You are going to make this from the remaining ribbed-tank
- Always start with small cuts, try it on, and adjust it as you go....using material will provide some pull, so, you can stretch if needed.
- Suspender Measurements: Measure about 5 inches and taper it in if adjustments are needed at the end; if your suspenders are crooked, you can trim them to even everything out.
- Consistently measure the thickness for the front, side, and back portions of the suspenders.
- Measure from the top of your shoulder to the middle of your abdomen (where the side portion of the suspender will begin...lets say for blog purposes it's 7 inches...in that case, draw a line on your tank starting from the top left corner, down 7 inches, stop.
- Now, go back to the top portion of your tank top, measure across 5 inches (thickness of your suspender) and draw a straight parallel 7 inch line.
- FRONT DIAGRAM, Left, Right, Middle, Side
L \ \ M / / R
5 s s 5
\ \/ /
V
\ \/ /
V
- Now the other side: start from the right top corner of your tank top, draw a 7 inch vertical line, measure 5 inches horizontally, and draw a parallel 7 inch line to match it...this should look like suspenders drawn on a shirt.
- Now, you just need to tweak it...imagine this, your straps need to come together at the bottom in a v-shape; where, you will sew a snap on the front and back portions to make a "bodysuit." If you need to make your straps longer to meet, forming the bodysuit, just take some scrap material, back in duct tape, and extend onto the suspenders.
- Side portion: Now, where you have stopped at the 7 inch line, leave a 5 inch vertical space and draw your line to the bottom of the shirt, tapering it into as you reach the bottom of your shirt. Repeat the Steps for the Right Side of the shirt
- Back Portion: Turn your tank over. You are going to make a 5 inch thick straight line strap that goes down the middle of your back which will connect your 5 inch sides, which will connect the front and back portions of your suspenders. Keep in mind, it will look like a cross.
Keep the back strap piece 5 inches thick and make the pattern long enough to go down your back and with enough room to sew 4 snaps on it and meet the front like a bodysuit.
So, it looks like the picture, on the back of the shirt, with a 5 inch space between the lines, connecting the left and right suspenders and the front v-portion snapping like a bodysuit.
 |
| See how to connect the side, the 5 inch, thickness...?? |
- Cut & Cover: Cut out the portions of the shirt that are not part of the suspenders, cover the front tank material with strips of orange duct tape, press against the shirt pattern, flip it around, add another strip; so, it's a layer of tape, shirt pattern, and another layer of tape...this creates the suspenders. Do not join the front and back, just tape them separately.
- Cover up all of the white tank with orange duct tape.
- Tape your sides to the back piece forming a cross and joining the top portions like a harness.
- Holes: Cut holes equally spaced down your straps.
- Snaps: secure with 4-6 snaps on the front and back crotch portions of the suspenders-ha, put the backings on either the front or back of the suspenders, and the snap portion on the opposing side. Snap together, joining the front and back which will form your suspenders-body-suit thingy!!! DONE! I wore this costume for a Music Festival Sci-Fi Night, Amberland...the snaps held up all night!!
Pants:
- Take your Sharpie and draw a vertical line from the top middle of the pants to bottom, front and back
- Draw a circle around each leg, just above your knee and another just below your knee.
Wig:
If you have long hair, braid your hair down your back, flip-up, and put a hairnet on to keep it thin so, it will fit, next step, GET WIGGY WIT IT!!!
And Voila...


No comments:
Post a Comment